USB drive disks are universally used portable data storage devices that bring great convenience to people’s life. They are small in size and with large storage volumes. They are recognized as a useful tool to store and transfer data from one computer to another quickly without using the network and worry of detection from the Internet. As long as people start to use USB storage devices, they are annoyed by USB security issues from time to time.
It has been proved that encrypting USB drives with specialized software is the most efficient and reliable way to ensure data security in USB drive disks. USB Security is specially designed to password protect USB disks containing confidential data and sensitive files. Even if you lost your disk, you would never need to worry about data security issues. It supports USB encryption in USB flash drive, pen drive, thumb drive, memory stick, SD card, TF card, etc. So no matter what kind of USB storage devices you use, you can lock USB drives with USB Security.
Get a free trial version of USB Security here and learn to lock USB dirks with an exclusive password right now!
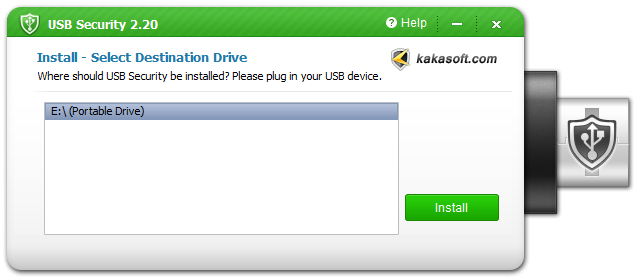
Step 1 Select drive to protect
To password protect your USB with USB Security, install it in your computer according to the wizard, then Plug in the USB drive and choose it from the drive list below. Click the “Install” button, and the program will be installed on the USB drive successfully.
Once USB Security is installed in a USB drive, you may protect the drive in any Windows computer without installing it anymore.

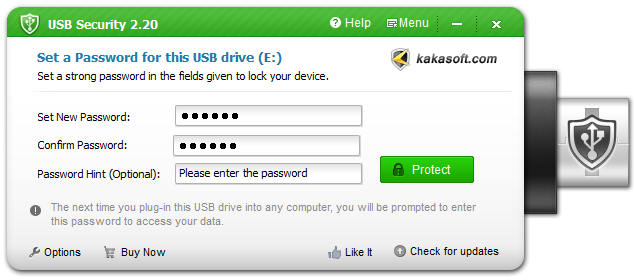
Step 2 Protect USB Drive with Password
To ensure USB encryption in USB drive disks, you need to open the USB drive first. Double click the “USBSecurity.exe” file to run the program, and then enter a password and confirm it.
To make your password more secure, we strongly recommend entering more than eight characters mixed with numbers, letters, and special characters.
You may set a password hint in case you forget the password.

Part 3. Unprotect USB Drive
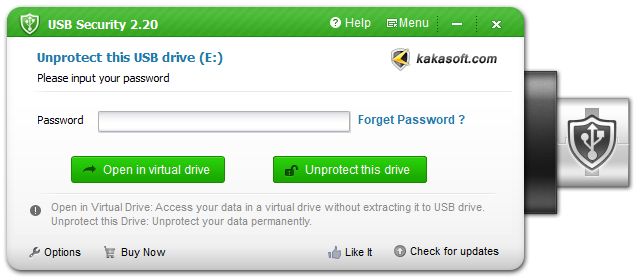
If you want to unprotect your USB drive disk, you are required to plug your USB drive into any Windows PC and then run USB security in the disk.

In the following window, enter your password. Then you can choose to access your data or unprotect the USB drive completely.
Click the “Open in virtual drive” button, and your data are unprotected to a virtual drive temporarily. You may access, copy or edit your data in the virtual drive. After that, click “Done,” and the program will protect the drive again.
Or Click the “Unprotect this drive” button, and the USB drive is unprotected permanently. You need to set a new password if you need to protect it again. 4. Tips about Option Settings
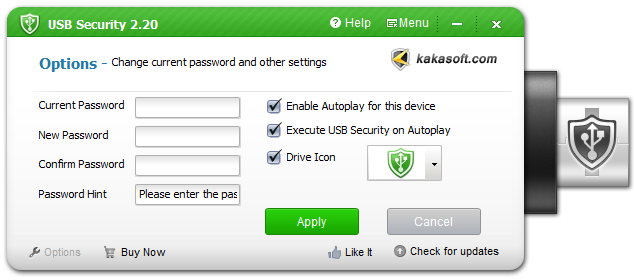
Step 4 Tips about Option Settings
1 Open the “Options” window.
Click the “Options” button on the bottom left of the main window or select “Options” from the “Menu” dropdown list on the top right of the main window to open it.
2 Change settings according to your needs.

Option 1 Reset password.
You may change your password whenever you want. To make your password more secure, we recommend you change your password every month.
Option 2 Enable or disable the Autoplay feature.
USB Security supports the Autoplay feature. You can set Autoplay settings by checking the options in the “Options” window. Once the autoplay feature is enabled, the program will automatically run immediately after you plug in the USB drive. This really saves your time.
Option 3 Choose your icon.
You may choose another drive icon for USB Security from the “Drive Icon” list.
Conclusion
Generally speaking, USB Security is a very convenient USB password protection software that you can protect and unprotect the flash drive in a few seconds.
A trial version of the software is provided, and you can use almost all the features without restriction. If you like this software, you can download and try it for free.